Hiking the Quilotoa Loop: The Most Popular Trek in Ecuador
Do you plan on hiking the Quilotoa Loop? The most popular multi-day trek in Ecuador should be on every traveler's bucket list when visiting the country. Follow our budget travel guide where we share tips on Quilotoa Loop hike, itinerary, where to stay, how many days you need, and overall, you'll find here everything you need to know before you go.
Quilotoa Loop is a ring-shaped trail that connects remote villages in the high Andes in Ecuador in the Cotopaxi region. It is a great introduction to the country's rural life and, at the same time, to hiking in South America.
You don't need a guide or porter to hike Quilotoa Loop even if you are inexperienced, but it is necessary to have some instructions before you set off.
This is why we've created this Quilotoa Loop travel guide that includes a suggested itinerary and practical information you might find helpful, especially if you've already started planning your trip.
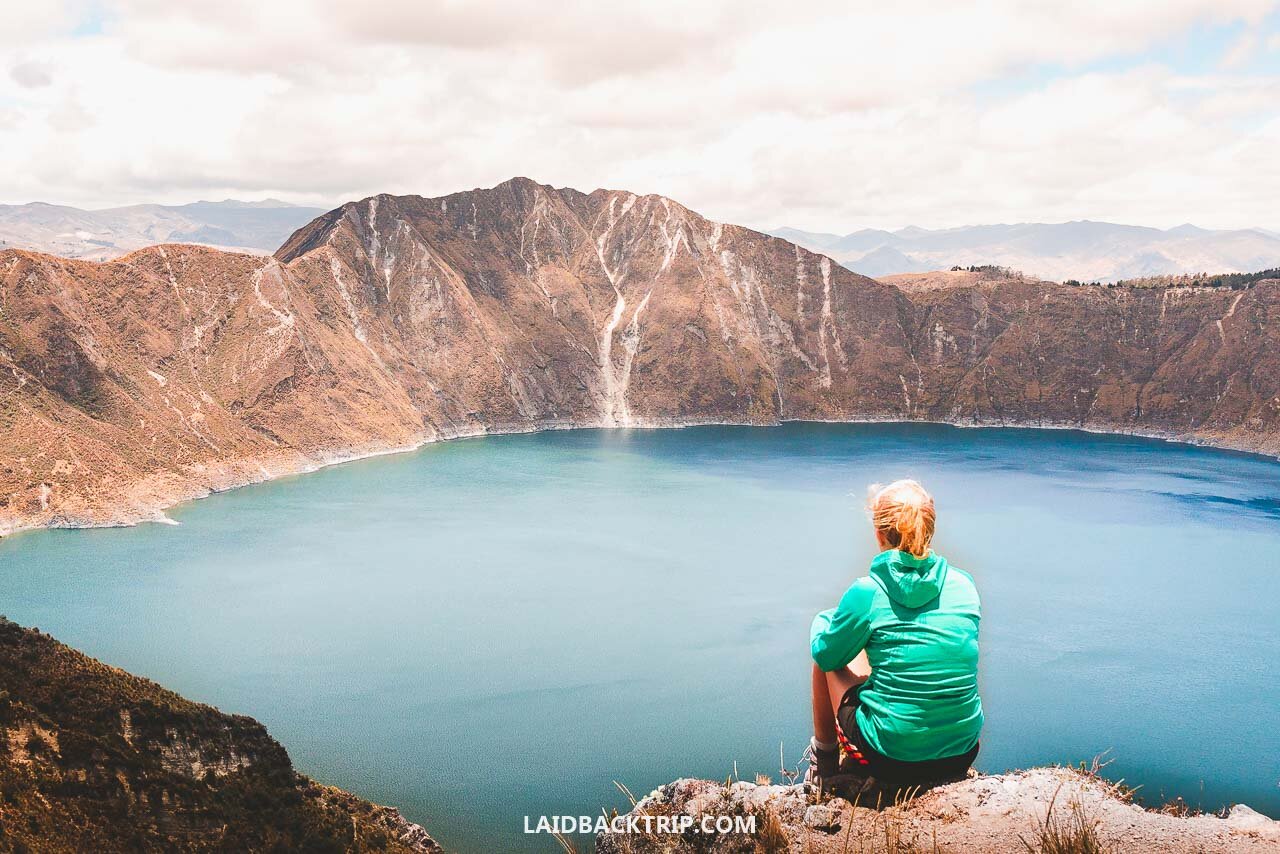
The loop walks across deep valleys, along dusty paths, around rolling green hills, through small traditional settlements, and either starts or finishes at the azure-colored crater lake high up in the mountains, which was created around 600 years ago by an enormous eruption.
This lake is called Quilotoa Lake, and it is one of the must-visit places in Ecuador.
Although you can visit Quilotoa Lake on a one day trip from Latacunga or even from Quito, it's a great adventure to hike the whole loop, especially for those seeking off the beaten paths.
Every blog out there says that you will get lost, but you don't need to worry.
Firstly, the trail markings have improved vastly over the past few years, and secondly, we've put together all information needed to help you with orientation.
We are not saying that there won't be a few places along the trip where you won't be entirely sure if you are still on the official hike, but we would not call it getting lost - it's just part of the adventure.
We have also created a post 16 Reasons and Things to Know Before Hiking Quilotoa Loop to make your experience even better, so make sure you read this post as well to be fully prepared for your Quilotoa Loop adventure.

QUILOTOA LOOP TREK
We know that a decision on making a multi-day trek on your long term travels or a regular holiday can be hard.
It requires a bit of planning; you need to figure out where to keep your luggage and things you do not want to carry with you, arrange transport, check out places where to stay, how much money it costs, etc. We feel you.
We also know the saying that after the battle, everyone is a general (that’s a nice saying we use in the Czech Republic), but it is really not the case of the Quilotoa Loop. Quilotoa Loop is really doable, and every traveler can make it.
Without any further ado, here's the Quilotoa Loop hiking guide.

WHERE TO START THE QUILOTOA LOOP
One of the most burning questions many travelers have is where actually to start Quilotoa Loop. You will, very likely, stay in Latacunga the day before the hike as it is the biggest city in the area and it is known as a base for hiking Quilotoa Loop, but where to go next?
You will probably appreciate the flexibility, as there is no given place where you have to start the trek, rather the opposite.
You can either start in the villages of Sigchos or Isinlivi (it depends how many days you have) and climb your way to Quilotoa, or you can begin at the Quilotoa crater lake and walk the other direction.
This option is less demanding as you will lose altitude as the Quilotoa is the highest point on the trail (there will also be a few climbs, though - you are in the mountains after all). The only downside is that you will see the highlight, Quilotoa Lake, already on the first day.
We preferred to keep the crater for our last day, so in this post, we will describe Quilotoa Loop as we hiked it, from Sigchos to Quilotoa, the classic Quilotoa route.

HOW MANY DAYS YOU NEED FOR QUILOTOA TREK
The whole loop is around 40 km long, and to finish it, it takes anything from two to five days, depending on your starting point and walking speed.
As per our experience, two nights and three days are sufficient enough.
We feel that two days would not be enough - for us, Quilotoa Loop was about walking the path and connecting with nature and getting an important insight into indigenous people's lives.
Three days were great as we did not have to rush, had enough time for photo stops, but on the other hand, we did not come to our accommodation too early.
If you are not fit or simply like to take things slowly, feel free to spend on the trail even longer. It is good to know that the area has many paths local people use, and if you are more free-spirited, it is possible to hike here for two weeks without meeting other travelers.
But in this travel guide, we assumed you are looking for information on the classic Quilotoa track, so we'll get back to it.


HOW TO GET TO QUILOTOA LOOP
This trek is so popular because of the easy accessibility from the capital of Ecuador, Quito.
From Quito, take a bus from the south terminal (Quitumbe) to Latacunga. Buses depart regularly, approximately every 30 minutes. The ride takes about 2 hours and costs $2.30.
Unfortunately, this bus is infamous because of robberies, so keep an eye on your valuables all the time - we recommend keeping your daypack on the lap, and Ecuador was also a place where we used our travel pouch.
You can spend the day in Latacunga, but if you are on time, feel free to carry on straightaway.
From Latacunga, you'll need to catch a bus to Sigchos or Isinlivi; it depends where you decided to start. The bus goes from the same terminal you arrived at before, and the bus to Sigchos goes at 6:00 AM, 8:00 AM, 9:00 AM, and so on.
You can buy a ticket in advance, but it is not necessary (we were probably the only ones who ever done it, judging by the looks we received at the counter).
The ride from Latacunga to Sigchos takes about 2 hours, the ticket costs $2.30, and you will be dropped off at the Sigchos bus station. You can take a bus also to Isinlivi, but it doesn't go that frequently.
If you want to start your multi-day hike in Quilotoa or visit the crater only on a one-day trip from Latacunga, it is also possible by public transport.
The bus goes approximately every hour, costs $2.30, and the driver will drop you off on the road within walking distance to the crater.
We returned from Quilotoa to Latacunga and found this bus much more crowded because there are more villages on the way, so be prepared for a very authentic bus ride.

ACCOMMODATION AND LUGGAGE STORAGE IN LATACUNGA
You will most likely spend a night in Latacunga, where you can also leave some of your things or even backpacks which you don't want to carry.
The most popular hostel in the city is Hostal Cafe Tiana.
It has reasonable prices, and although it is not the most beautiful accommodation ever, you can safely store your bags here (bring your padlock). We stayed there a night before the trek.
When we came back, we slept in nicer (and even cheaper) Hostal Latacunga.
If you are looking for a treat, then consider Hotel San Agustin Plaza.
IS THE QUILOTOA LOOP WELL-SIGNPOSTED?
Yes. A lot has changed recently, and the trail is now well-signposted; it is usually a work of hostels along the way who want to ensure their guests will safely find the way to their property.
Also, hostels will provide you with basic maps and instructions.
We would still recommend using the Maps.me app, though. This app works offline, and there are marked even the smallest local trails.
We must admit that there were a few places where we were not sure if we are still on the official trail - some paths are very narrow and often used by shepherds, but we never had to retrace our steps.

WHERE TO STAY ON QUILOTOA LOOP
The accommodation along the trail was surprisingly comfortable. Rooms were equipped simply but were clean, the shower was hot, and there was also a wifi connection - something we really did not expect.
The room price usually includes dinner and breakfast, and there is an option to buy a packed lunch for the next day, an option we happily used. Rates with two meals were in the range from $30 - $40.
If you will follow the trek the way we did it: Sigchos > Isinlivi > Chugchilan > Quilotoa, you can stay in the following hostels.
Sigchos: Not many travelers stay in Sigchos. It is a village where we started, and if you hike in the opposite direction, you will likely want to get to civilization. But just in case, check out this basic hostel, Starlight Inn.
Isinlivi: We stayed in pleasant Hostal Taita Cristobal, or there is another and more popular option with jacuzzi Hostal Llulu Lama. This hostel is the most famous one on the whole trail, so if you want to stay here and
Chugchilan: There are a few reasonable accommodations in this village. We decided on Hostal Cloud Forest, but there are also other excellent lodgings such as Hostal El Vaquero.
Quilotoa: The most touristy village of all, because visitors can get there directly by bus from Latacunga. Prices are also a bit higher, and not all hotels include breakfast and dinner in the rate. Try Hostal Chukirawa.

WEATHER
The weather in the mountains is unpredictable and can change rapidly. Your best bet is to start early in the morning as it is usually sunny without clouds, afternoons are quite often cloudy and rainy.
We did the hike in September and were lucky enough not to have rain, but it was too hot during the day and quite cold at night.
In general, the best time to hike Quilotoa Loop is between the end of June and the beginning of September as it is a dry season in Ecuador, but December till February is also a very popular period.
Also, a cold wind picks up, especially at Quilotoa Lake.
We would say there's no bad time to hike Quilotoa Loop; you just need to be well-equipped and not underestimate the elements.

WHAT TO PACK
As the conditions can be changeable, the rule of thumb is to pack layers so you can put them on and off depending on the weather. You will need sturdy hiking boots, a rucksack (30-40l), a rain jacket, and both thin and warm layers of clothes.
Take a long and short-sleeved t-shirt, hiking pants, shorts, sunscreen, and a hat.
Also, pack warm clothes to wear in the hostel, but you won't need a towel and a sleeping bag.
We also found it quite helpful to bring trekking poles as they reduce knee stress when hiking downhill or uphill and are great for establishing walking pace and rhythm. It is also wise to carry a stick in hand in this area because of strayed dogs.
Quilotoa Loop is a demanding and challenging trek around Ecuadorian mountains, and some high nutrition energy bars will help you pull through.
It is not recommended to drink tap water in Ecuador, so in order to keep your plastic waste to a minimum, buy SteriPen or a water bottle with integrated filter. Our secret weapon in our backpacks is the duct tape that can often fix stuff temporarily.
If you are not sure what to pack, check out our more detailed post, Quilotoa Loop packing list, where you will find more tips and advice!

ALTITUDE AND TRAIL'S DIFFICULTY
The Quilotoa loop starts in Sigchos (2850m), descends into the valley, follows the river, and finally climbs up to Isinlivi (2950m).
The next day is about the same; the trail descends back into the valley, then the path climbs steeply to Chugchilan (3200m).
Last day you need to get to the Quilotoa crater (3800m), but first, it is necessary to get down to the valley and start the climb from the lower point.
As you can see, there are a lot of ups and downs on Quilotoa Loop, and you cannot avoid it, even if you do the hike from the opposite side.
On the other hand, this profile is perfect for steady acclimatization, which is necessary before reaching Quilotoa Lake.
If you start at Quilotoa, make sure you acclimatize yourself for a day or two - it is definitely not a good idea to arrive straight from the Galapagos Islands. The Quilotoa loop starts in Sigchos (2850m), and descends into the valley, then follows the river, and finally climbs up to Isinlivi (2950m).
Next day is about the same the trail descends back into the valley then the path climbs steeply to Chugchilan (3200m).
Last day you need to get to Quilotoa crater (3800m), but first, it is necessary to get down to the valley and start the climb from the lower point.
Travel Insurance
We never leave our home without travel insurance which is designed to help cover our expenses if something goes wrong during the trip.
When trekking the Quilotoa Loop in Ecuador, make sure your travel insurance also covers high altitude hiking.
World Nomads provides travel insurance for travelers to cover their trip essentials, including sports and adventure activities.
SafetyWing is affordable travel insurance for backpackers, long-term travelers, and digital nomads.
Travel smarter and safer!

BUDGET
The Quilotoa Loop is a budget-friendly hike. Together, we spent $100 for two nights and three days when we count accommodation, food, and transport since we started and then finished in Latacunga.
If there's one thing you should know about us, it is that we can live frugally on the road.
So if you cannot imagine your life without snacks and beer, budget a bit more.
As there's no ATM along the trail, withdraw emergency cash so you have enough money, just in case.

QUILOTOA LOOP SAFETY
Hiking Quilotoa Loop is considered safe. The only serious issue you might have is dealing with altitude sickness, but the proper acclimatization, for example, in Quito, should be enough.
Another inconvenience (and one of the things you should know about South America in general) are strayed dogs along the road - luckily we met just a few.
Since our unpleasant experiences with dogs in Playa de Belen or Tupiza, we walked with a wooden stick and a couple of stones in our pockets.
There is also cattle on the pastures. Some bulls did not look particularly friendly, so we tried to walk as far as possible.

QUILOTOA LOOP HIKE ITINERARY
In the next part, we will slowly walk you through the Quilotoa Loop trek.
We think that every average fit traveler should be able to finish the hike in three days as we did, but feel free to adjust this itinerary according to your needs.
Hopefully, this hike description will help you to stay on the trail all the time.
DAY 1: SIGCHOS > ISINLIVI | HIKE DURATION: 3-4 HOURS | DISTANCE: 14 KM
The first day of the hike is a pleasant walk that is often flat or goes downhill (with one exception), so take your time, start with breakfast or early lunch in one of the local eateries in Sigchos after you arrive from Latacunga.
The trail starts from the south-east part of the town. There is also a red and yellow sign showing the right direction.
Follow the unpaved road, go down, pass by the church, and in 200 meters, the road sharply turns left.
You can now leave the road (there is another sign), so follow the sign and take a shortcut.

After a few minutes, you will see another sign, which says not to turn right. Listen to the instructions and turn left instead and take a narrow trail steeply heading down into the valley.
Once you emerge back on the main road, turn right and go down.
Then again, there will be another sharp U-turn.
Leave the road and take a shortcut. Finally, you will appear at the bottom of the valley, so here join the unpaved road.
Turn right and follow the road (on your left side should be a big concrete bridge, don't cross the river yet).
Now comes the easy part, as your only task is to stay on the dirt path. In about two kilometers, turn left and leave the road.
There is a small farm, a sign pointing left, and a horse. I'm not sure if the horse will be there when you do the hike, but you can't miss the sign.
Walk through some farmlands, along cornfields, and slowly descend to the river.
You will see a concrete bridge, and this time, cross it. Past the bridge, turn right, and in 20 meters, turn left, and climb the short slope.
You will emerge on the unpaved road, turn left, and then turn right when you get to the T-junction. Follow the road.
Here comes the tricky part, and you have two choices on how to continue. If you're using the app Maps.me, you will see a trail turning left.
We took this path, but there was a closed gate with barbed wire in the middle of the climb.
Fortunately, there was a family who owns a property, sitting under a tree, so we politely asked them if we can carry on because we didn't want to go all the way down.
They approved, and the lady even offered us lunch, a nice bowl of soup and eggs.

The general rule is, if you see a closed gate, you can go through, but don't forget to close the gate behind you and also watch for dogs.
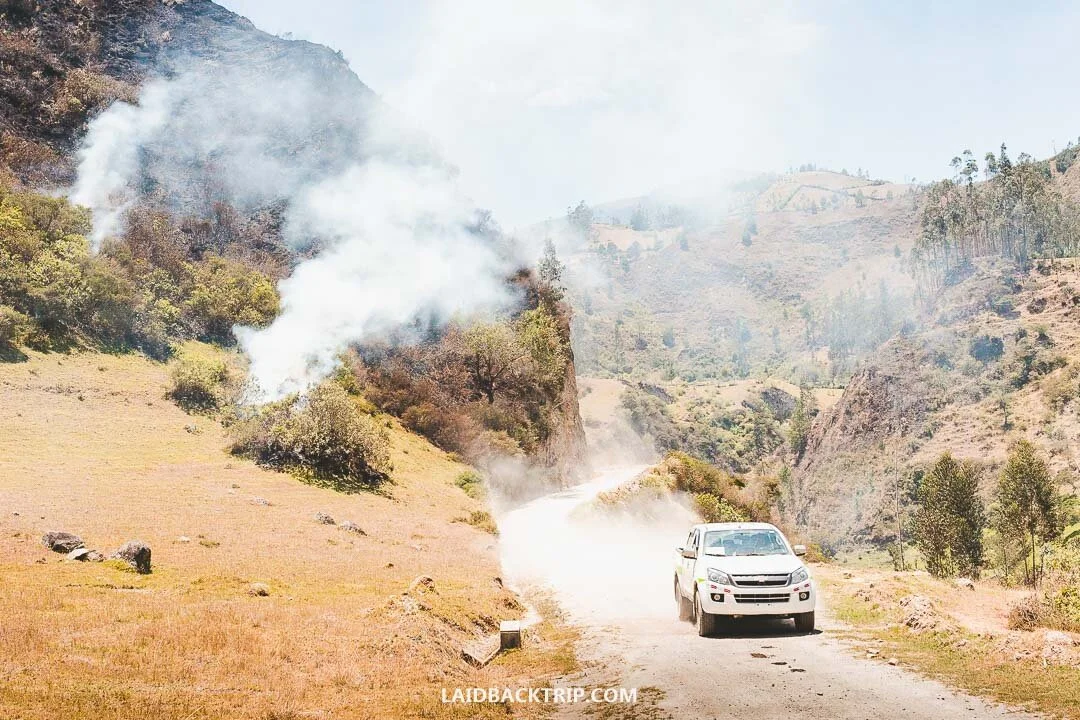
The views of the valley from here are stunning, unfortunately, at the time of our hike, the local farmers were burning their fields to help new plants grow next year, and the whole valley was covered in haze, and the air was filled with the smoke.
When you get to the top, you will join the main road, turn right, and in 30 minutes, you will arrive at your today's destination, Isinlivi.

Isinlivi is a small rural village, and there is not much to do.
There is a small craft shop where local women will tell you everything about their work and products and a few small shops.
We accommodated ourselves in Hostal Taita Cristobal, went to a mirador before sunset, and then just waited for dinner and relaxed.
DAY 2: ISINLIVI > CHUGCHILAN | HIKE DURATION: 4-6 HOURS | DISTANCE: 12 KM
When we woke up, the sun was already out, and it looked like it would be a beautiful day. The air was clear, and there was no sign of fires. We had granola, yogurt, and fresh fruit for breakfast.
Then we got our lunch snacks, quickly packed our stuff, and started our hike shortly after.
We got the simple paper map with instructions in the hostel, but good news, the trail is well-signposted, so follow the path and red and yellow arrows, and you should be fine.
You have two options on how to get to Chugchilan today, and it's only up to you which road you'll take.
One of the trails is shorter, the other is longer, but according to the map and the people in the hostel, more beautiful. After a brief discussion, we chose to hike the longer trail, which should have taken about 5-6 hours.
The first part of the trek led us down to the valley where we crossed the concrete bridge, hiked a little bit up, walked through a pasture with bulls (don't get too close), and then turned right (there is a big red and yellow sign).

When looking back, you will get a stunning view of the valley, where you hiked yesterday, and higher above on the right side, you should see the village of Isinlivi.
Now the path will take you all the way down the valley, follow signs and trail; at some point, you will walk through farmlands, and then you will see a huge rock wall towering above you.

Still, continue down. You need to get to the river, watch for the yellow and red paint on the rocks or trees. The trail here is narrow, steep, and unpleasantly dusty, and it might get muddy after rain.
Finally, we arrived at the bottom of the valley and crossed the river on a wide wooden log. On the true left side of the river, turn left and join the unpaved road.

After about 20 minutes, you will arrive at the intersection with a proper bridge.
We decided to eat our lunch here and take a break in the shadow. If you followed the shorter trail, this is the place where the paths merge into one.
Don't cross the bridge back unless you want to get back to Isinlivi and follow the main road. You will start to gain elevation, but it's a pleasant walk except for the dust.
There is a house on the right side along the way, where you can buy some refreshments.
After you reach a small settlement of Itualo, with several cornfields, few houses, barking dogs, and a church, turn right, and you will start your climb and the hardest part of the day.
The elevation gain is about 200 meters, so take your time and enjoy the stunning views of the valley.
At this point, we met a girl who asked for money and candies and hiked all the way up behind us.
There were more kids at the top of the hill, and later when we talked to other hikers, they told us the same happened to them.
Please don't give them any money (anyhow bad it might sound), as it will encourage them in this behavior. If you want to help, bringing school supplies might be a good idea.
There is a newly built mirador at the top of the hill with spectacular views of the valley, which is just a short detour from the trail, and you can make a small donation if you've enjoyed the place.

Back on the trail, follow the signs, and shortly after, you will get the views of the other side of the valley. Continue walking, and you will emerge on the paved road (also newly built), turn left, and it's about a 2 km walk to Chugchilan.
We arrived quite early to Chugchilan, even though we took the longer route and spent the rest of the day relaxing, talking with others, and catching up with tv-shows in our room in Hostal Cloud Forest.
They provided us with a portable heater, which we didn't have to use, as the night wasn't that cold and we had more than enough warm blankets.

Later that evening, we had dinner and received a basic paper map (with hiking instructions in English on the reverse side of the map) and brief instructions about the trail, which we were about to hike the next day.
The guy from the hostel told us (with help from a fellow hiker who translated) that we can choose between two trails.
As usual, the nicer path was supposed to be harder, and also there was a short but potentially dangerous landslide area, but it seemed that the majority of travelers would take this path, and so we did.
DAY 3: CHUGCHILAN > QUILOTOA | HIKE DURATION: 6-8 HOURS | DISTANCE 12KM
We woke up early in the morning, and after breakfast, we picked up our lunch, packed our stuff, and set off.
The weather was changing fast that morning, with clouds and colder winds coming through the valley. Luckily the sun came out, and we decided to wear only shorts and short-sleeved t-shirts.
We walked through the quiet village, followed El Vaquero signs, and turned left before the local library. The path led us further down the valley until we reached an important intersection, where the trail splits.
We turned left and were going down until we reached the bottom of the valley with a small wooden bridge, which we crossed and immediately started our climb back to the top of the rim.
The right trail goes to Quilotoa crater via La Moya village.

The climb was fairly steep, but we were still full of energy and quickly made it to the top.
The landslide area turned out to be not particularly dangerous it might be a different story after heavy rain, though.
Finally, at the top, there are two viewpoints.
The first one is only a few meters from the place where you just finished your climb; the other one is a short (about 200 meters) walk along the ridgeline and offers one of the best views on the whole Quilotoa Loop.
The views are also the best reward for your effort. Savor the moment, and appreciate it. Later on, we thought of this canyon on our day trip to Colca Canyon in Peru. But that’s a different story.
From the viewpoint, we followed the unpaved road all the way to Guayama San Pedro village.

We turned right after we passed an outdoor playing area and walked straight until we reached another intersection, where we turned left and followed Rosita Hostal signs.
After we left the hostel behind us, we took a break and had our packed lunch, bun with cheese and tuna fish, and after we refreshed ourselves, we started our final climb to Quilotoa crater rim.
The unpaved road leads directly to the top of the volcano, only follow big green or brown Quilotoa signs, and you can't get lost.
The road and the signs are a huge improvement from the past years, and most of the older travel guides and trek information have outdated information about this part.
You will walk and gain elevation quickly, and the only thing that makes the climb unpleasant is the ubiquitous wind, dust, and sand.
In about an hour, you will reach the rim.

The views from the top overlooking Quilotoa Lake are breathtaking. The crater is 3 km wide, water-filled, and the lake has a greenish color. It reminded us a bit of our previous hike in the northern Ecuador, Laguna Cuicocha.
Once again, you will face two options on how to get to Quilotoa village.
The trail which leads to the right is an obvious, shorter, and easier choice. But if you have enough time and energy, you can turn left and walk the longer and harder route. In that case, add 3 - 4 hours to your walk.

We chose to walk the faster route, as we wanted to get back to Latacunga that day. The trail should be easy to follow from now on; just walk along the rim and watch for the signs.
It was extremely windy at the top, and we were hungry, so we decided to find a nice and protected place to eat, which turned out to be a big mistake, as we eventually lost the trail.
With a little help from a local shepherd, we eventually found the rim trail again and could carry on to the village.


The walk around the crater is an adventure itself, the clouds and sun play a game of shadows on the lake surface, the unforgiving wind pushes you furiously out of the trail, and the sand is everywhere.
At last, after almost 6 hours of hiking, we reached the village of Quilotoa, walked through, and caught the bus to Latacunga.
If you arrive later in the afternoon, you can spend a night here, watch sunset or sunrise over the lagoon, and resume your Ecuador itinerary the next day.
Travel Resources
Here you can find links to all the travel resources we use and which you might find helpful when planning your next holiday.
Accommodation: When looking for accommodation, we usually search hotels via Booking.com or Hostelworld.
Tours: Although we love to travel independently, some places are better to visit with a guided tour.
We prefer GetYourGuide for its easy-to-use interface and solid reputation. Another great alternative is Viator.
Rental Cars: When going on a road trip, we always use Rentalcars.com, a reliable site for booking a rental car in advance.
Flight Tickets: When looking for flight tickets, you can search Skyscanner to find the best price.
Travel Insurance: World Nomads and SafetyWing cover against risks of travel.


